(This post contains affiliate links)
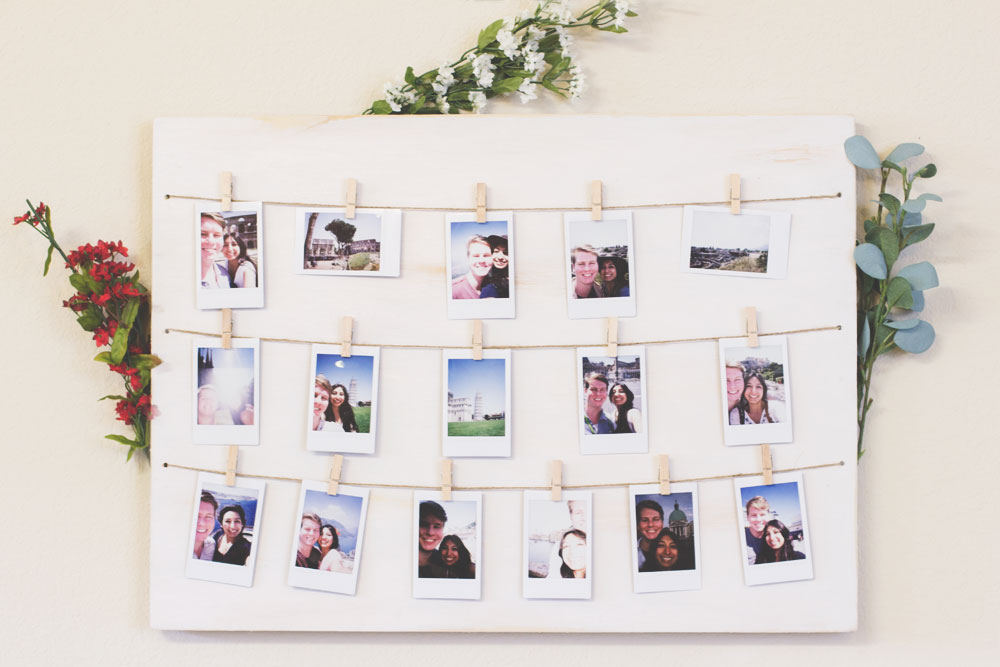
In this home DIY I am going to show you how to make your very own distressed clothespin Polaroid photo display! It may look a little complicated, but don't worry, it's very easy. The end result is so beautiful as well, people will think you bought it from somewhere like Target!
I was inspired by this display that I was gifted a few years ago. I use it to display all of my mini instant Polaroid photos from our Canada trip in 2015! (I shot these photos with my Instax Mini. It's an awesome camera and I definitely recommend getting one for yourself, find some here for purchase.) So, I decided to simplify and replicate the display as best I could with a piece of scrap wood I had lying around.
I hope you love this DIY and it helps you create your very own for your beautiful bohemian home!
↠✧❈✧↞
What You Need:
›› wooden board ( I used an 18" x 22.25" board )
›› sandpaper ( I used medium grit )
›› off-white / oatmeal acrylic paint
›› paint brush
›› pencil
›› ruler
›› drill
›› stringing material ( I used twine )
›› hammer
›› picture hangers
›› mini clothespins
›› Polaroid photos
›› nails to hang
DIY Home | Clothespin Polaroid Photo Display
1. To begin, first sand down your wooden board with the grain so the wood absorbs the paint. Make sure to also get the edges!
2. Apply a coat of paint to the entire wood board, also making sure to cover the edges. Covering the back isn't necessary, but you can if you want to! Let the paint completely dry for an hour or two. If you can still see the color of the wood underneath the paint, consider adding another coat.
3. (Optional Step) If you would like to add a distressed look to your display, grab your sandpaper again once the paint has completely dried. Lightly rub the sandpaper across the surface along the grain to get a vintage and worn look.
4. Depending on how big your wooden board is, determine how many rows of photos you want to add. Once you've decided, we'll figure out the measurements. Subtract 1" (2.54 cm) from the length of the board. Then, divide the length (minus 1") by the number of rows you want so you know how far to drill the holes on the board.
For example, my board length is 45.72 cm. I will subtract 2.54 cm, making it 43.18 cm. I want 3 rows of photos, so I will divide 43.18" by 3, making each string 14.39 cm apart, with 2.54 cm of room at the top. (Using centimeters helps make the measurements more accurate.)
For example, my board length is 45.72 cm. I will subtract 2.54 cm, making it 43.18 cm. I want 3 rows of photos, so I will divide 43.18" by 3, making each string 14.39 cm apart, with 2.54 cm of room at the top. (Using centimeters helps make the measurements more accurate.)
5. Mark your board with your pencil half an inch (1.27 cm) away from the edge at the increments you've decided.
6. Drill a hole in the spots you have marked with a drill bit that is a good amount larger than the stringing material you have chosen. This will make it easier to string it through.
7. Flip the board over and screw / hammer in your picture hangers at the top. (I used 2.)
8. String your material through a little loosely and double knot on both ends to secure.
9. Hang your Polaroid photos on the string with your mini clothespins.
10. Hammer your nails in the wall the same distance that you attached your wall mounts.
Then, hang up your beautiful creation and admire! :)
I hope you loved this DIY as much as I did!
Did your try this bohemian home DIY Clothespin Polaroid Photo Display yourself?
How did it turn out?
Let me know in the comments below!


I really like this idea ! Thank you for sharing.
ReplyDeleteThank you Virginie, I'm glad you enjoyed it!
DeleteLove this! I am going to give it a try somewhere in my house... I'll let you know how it turns out :)
ReplyDeleteThank you Julie! Yes, let me know how it looks!
DeleteThis is so cute!! Totally doing this soon :)
ReplyDeleteThank you Becca, let me know how it goes! :)
DeleteThis is such a great idea! Looks like I just found my next weekend project!
ReplyDeletexox Cheyanne
Thank you Cheyanne! It is an awesome littler weekend project. Let me know how yours turns out!
DeleteWhat a cute idea! Love it!
ReplyDeleteThank you Stephanie, I'm glad you enjoyed the post!
Delete